Illustrated User Guide to the Recurring Interface
Note: the “Gears” and “No-entry” symbols figure frequently within the Recurring interface.

The “Gears” icon indicates an active plan or transaction, clicking it will update the item’s status to suspended.
The “No-entry” icon indicates a suspended plan or transaction, clicking it will update the item’s status to active.
All Plans/Recurring Homepage

The left hand menu provides a list of the Recurring areas available and is always visible within the Recurring interface.
The top of the screen summarizes files statuses and activity:
- Total Plans
- Queued Plans
- Activated Plans
- Last Run (the last date and time that a plan processed)
Plans are listed in reverse chronological order with the file updated most recently on top.
Plans can be sorted by clicking on the respective column headers: Status, Name, Count (number of transactions), Net Amount (Activated minus Suspended transactions), Frequency, and Next Run date.
Multi-edit plans (Activate, Suspend, or Delete) by selecting the checkboxes next to each individual plan or using the ‘Select’ link, then choosing an action link. The ‘Unselect’ link will deselect all checkboxes.
The number of plans displayed per page (10, 25, 50, 100, or 250) is determined by the individual user's preferences.
Plan Details Screen

To view a listing of the transactions in any particular plan, click on the file’s line.
The new screen lists each transaction in the file.
Transactions can be sorted by clicking on any column header.
Available categories:
- Status
- Cardholder name
- Transaction type
- Card type
- Card number (full values are masked for security purposes)
- Card expiry date
- Reference Number
- Amount
Click the ‘…(edit)’ link to update the plan details: start and end date, frequency, and status.
The top of the page summarizes files statuses and activity:
- Plan Total (Dollar amount of activated minus suspended transactions)
- Number of active transactions
- Scheduled Start and End dates
- Frequency
- HCO Plan ID (used when integrating Payment Pages)
- Last Run (the most recent processing date and time of a plan)
On this screen plan status is indicated on the “Status:” line. A suspended plan is noted by the text, ‘Suspended’ in red. Conversely “Active” is noted in green. Activate or suspend the plan by clicking the functional link.
Multi-edit transactions (Activate, Suspend, Delete, Move, Copy, Set amount, Bulk changes) by selecting the checkboxes next to each individual transaction or using the ‘Select’ link, then choosing an action link. The ‘Unselect’ link will deselect all checkboxes.
Plan Processing History
If the plan has been run at least once a '(view history)' link displays on the page along with the number of times it has been processed. For example, the screenshot below indicates the plan has processed once.

Click the '(view history)' link for further processing details.

Transaction Details Screen
Open the details for an individual transaction by clicking anywhere on its line.

Use the fields in this details box to update:
- Transaction type
- Amount
- Cardholder’s Name
- Credit Card Number
- Expiry Date
- Reference Number
- Customer Reference
- Reference 3
- Transaction Start Date (overrides Plan Start Date for this transaction only)
- Transaction End Date (overrides Plan End Date for this transaction only)
- Status
Create Plan

Plans can be entered into the Recurring system by uploading a file or creating a new plan from scratch.
Upload from file

The two file formats accepted by Recurring are ‘CSV’ and ‘SPW’. The SPW format is outlined here, and the CSV format is outlined here.
Review all plans uploaded by clicking the 'All Plans' link on the left hand menu at any time.
Updated Today (Plans)

This screen only lists plans that have been updated, uploaded, or created on the current day.
All features and links mentioned above under All Plans are also found on this page.
Added Today (Plans)

This screen only lists plans that have been uploaded or created on the current day.
All features and links mentioned above under All Plans are also found on this page.
Queued

This screen lists the plans that have been picked up and are “waiting” to be parsed and sent to the bank. Once the plan begins processing this will be noted in the ‘Processing’ column. Completed files will disappear from the ‘Queued’ section and be listed on the ‘Processed Plans’ page.
All Transactions

This screen lists all of the transactions contained in every plan in the merchant’s account.
Transactions are listed in reverse chronological order with the transaction updated last on top.
Clicking on any column header will sort the transactions by that classification.
Available categories:
- Status
- Plan Name
- Cardholder name
- Card type
- Card Number (full numbers are masked for security)
- Card Expiry date
- Reference number
- Amount
Multi-edit transactions (Activate, Suspend, Delete, or Copy) by selecting the checkboxes next to each individual transaction or using the ‘Select’ link, then choosing an action link. The ‘Unselect’ link will deselect all checkboxes.
To navigate through multiple pages of transaction listings, click on the page links.
The number of transactions displayed per page (10, 25, 50, 100, or 250) is determined by the individual user's preferences.
Updated Today (Transactions)

This screen only displays transactions that have been updated, uploaded, or created on the current day.
All features and links mentioned above under All Transactions are found on this page.
Added Today (Transactions)

This screen only displays transactions that have been uploaded or created on the current day.
All features and links mentioned above under All Transactions are found on this page.
Expiring

This screen only displays transactions with credit card expiry dates that have either passed (indicated in red) or will be expiring within the current or next month (indicated in yellow or orange).
All features and links mentioned above under All Transactions are found on this page.
Processed Plans
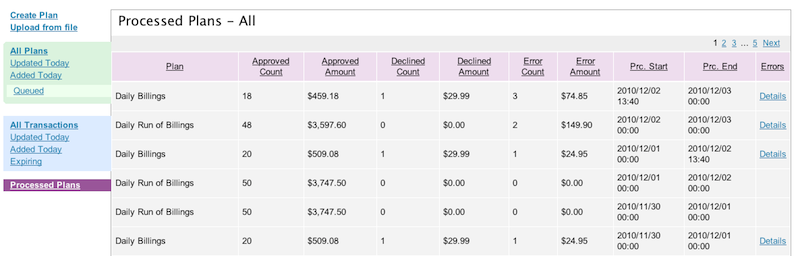
This screen lists all plans that have processed through the merchant’s account.
Plans are listed in reverse chronological order with the file processed last on top.
Files can be sorted by clicking on the respective column header.
Available categories:
- Plan Name
- Approved Count (number of approved transactions)
- Approved Amount (total dollar value of all approved transactions)
- Declined Count (number of declined transactions)
- Declined Amount (total dollar value of all declined transactions)
- Error Count (number of error transactions)
- Error Amount (total dollar value of all error transactions)
- Processing Start (date and time)
- Processing End (date and time)
- Errors (this column displays ‘Details’ links if any errors occured during processing)
To navigate through multiple pages of transaction listings, click on the page links.
To view a listing of the transactions processed in any particular plan, click on the plan’s line.
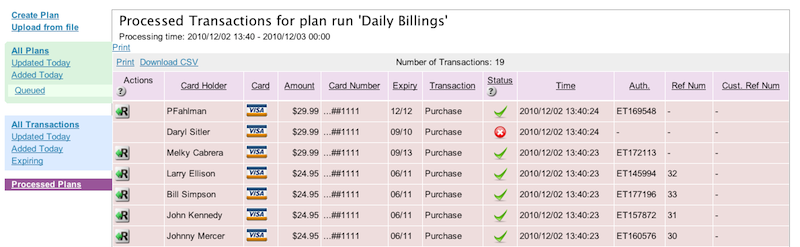
The new screen lists each transaction processed.
Transactions can be sorted by clicking on the respective column header.
Available categories:
- Transaction type
- Cardholder name
- Card type
- Card number (note that full values are masked for security)
- Status (approved or declined)
- Card expiry date
- Processed date and time
- Authorization number
- Reference Number
- Customer Reference Number
Refund approved transactions by clicking on the “R” button next to it – this will expand the transaction details so the reference number can be changed or the amount adjusted down. Press the “Submit Refund” button to finalize the transaction.
When viewing an approved transaction the same day it was processed a “V” button for void will also appear beside the refund “R”. A void allows the transaction to be canceled without it appearing on the cardholder’s statement.
Download the CSV file for the processed transactions or Print this page by selecting the respective links.
Was this article helpful?
That’s Great!
Thank you for your feedback
Sorry! We couldn't be helpful
Thank you for your feedback
Feedback sent
We appreciate your effort and will try to fix the article